Thursday, March 17, 2016

Playdoh

Ever since I was a child, I had seen and used home made play dough, but never before had I realized how EASY it is to make. 

We've been a name brand play-doh family since my daughter received her first tub a year or two ago with some dough crafting toys in a kit.  For whatever reason it always seemed very firm and not easily molded by her tiny hands.  Even after "working with it" for a while it never seemed to get better.  Then there is the drying, crumbling, clumping, and not moldable anymore, wear out factor.  After a few months we had little crumbly chunks of play-doh everywhere each time she played. Moms out there who can sympathize, give me a shout out!  

We found the recipe below and WOW I will never buy play-doh again.  It is so soft and malleable.  I found MYSELF playing with it 10 times more than I ever did with the store bought stuff.  It's simple to make, from a few all edible ingredients, and it makes a HUGE batch.


Huge!

At first I was wanting to divide it into several colors, but have discovered that having just ONE color to play with is also very beneficial.  We don't have arguments over which color to use.  We don't have the 2 year old, OCD, I'm gonna change my mind in 2 seconds, and now I want the color HE has.  I'm always a little tense about all the colors getting mixed together anyway...something I inherited from my mother and childhood I supposed.

Side note:  Just now, as I'm writing this, I can hear the kids out on the dinning room table playing with dad.   My husband JUST said, like as I'm typing this post, "I like this stuff, this is way better than play-doh" and he doesn't even know what I"m doing right now as I hide away in the office to "de-stress".

Which reminds me, my daughter plays with this home made recipe at least twice as long as the store bought kind.  It seriously keeps her attention longer and the sheer volume of one lump of dough greatly expands creative possibilities. 

Have I convinced you to switch yet?


Home Made Play Dough

2 cups water
3 Tbsp vegetable oil
food coloring

1/4 cup salt
1 Tbsp alum
2 cups flour

Combine water, oil, and food coloring in a saucepan.  Bring to a boil. 
(Don't add oil and water together after one has been heated, just a little something I learned from my chemistry days)

Meanwhile in a separate bowl, combine dry ingredients.

Once the liquid mixture is boiling, pour it over the dry ingredients and stir to combine. 

Knead on a floured surface to enhance elasticity.

Store in a air tight container or bag.

As a closing note, may I add that playing with the fresh, still warm dough, is very therapeutic.  You might just want to make a new batch EVERY time your kids want to play so you can enjoy it yourself.  I would assume you can half the batch if you don't want so much, or could split into multiple colors, but why bother when it's great the way it is!!

Candle O Lard

Who knew you could make a candle from a bucket of lard?  I know there are many "tub of lard" jokes, but this is certainly not one of them.  In case of emergency, read below!!!  

Our insurance agency sent out a spring weather emergency preparedness guide.  A practical little pamphlet with ideas on how to handle various spring weather outcomes.  Make an emergency candle out of lard?  I had to try this!!

Two...wait...three years ago, when our family went diary free for a stint, I had purchased this bucket of lard on clearance at our local grocery store for $2.49....as the lid clearly states.  It came in handy for a few homemade tortillas and trying to keep the rabbits from eating our cucumbers out of the garden, at least that is what it was supposed to do.  Well, here we are years later with the old tub 'O chub that I for one reason or another had not yet dumped in the trash.

The instructions were simple:  place a string or cotton in the bucket and ignite.
Sounds easy enough, right?


At first I tried just pushing a cotton ball part way into the lard, but it burnt out quite quickly.  

The second time I took a cotton ball, dipped my fingers into the lard, and rolled in into a slimy little cocoon, then stuck it half way into the lard and lit. It worked!!


We also experimented with some Q-tips (upper left above), but were grossly unsuccessful.

What a fun little activity this was for my daughter and I.  It's so exciting that she is finally reaching an age where these things can be fun for both of us, and the scientist in me can slowly unleash all that I can't wait to teach my children.  There will be no shortage of science experiments in this household.  

Future, here we come!

Now it's your turn.  Let me know how it goes.


Thursday, March 10, 2016

Springtime Decor

Walked around the flower beds today and we are nearly in bloom!!! Considering we had the earliest 80 degree day in record in Iowa the first week of March, I'd say things are well on the way toward SPRING. Finally time to head for the basement and bring out some cheerful decor.  Hurray!


Dining Table Center Pieces

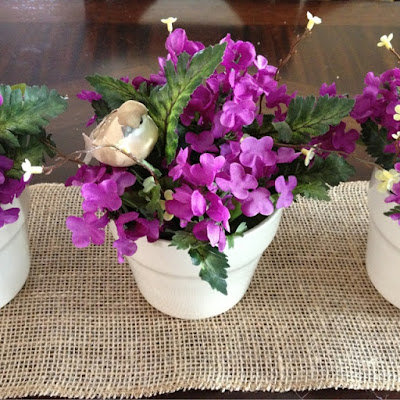
I bought these pots at IKEA last month, and I think they are perfect for this!  The price tag wasn't bad either :)  I made a small burlap runner and lined it with these three low profile, but highly adorable arrangements.  

Mantel

I went simple on the mantel displays.  I wasn't exactly sure what to do here, since most of my spring decor items are on the small size.  Something I will have to remedy once clearance hits in a few weeks, but until then. you've got to do what you can with what you've got!


Buffet

This little cutie is one of my favorites!  


Front Door

I have to say putting this wreath on the front has made all the difference to the atmosphere of our entry way! I love how the spring light shines through the sheer curtain every time I walk by.

Welcome Spring!!


Sources:

Tan Flower Pots: IKEA
Purple and Pink Flowers: Dollar Tree
Tan Birds: Dollar Tree
Burlap: Hobby Lobby and Walmart
Spring Sign: Hobby Lobby
Ceramic Birds: Michaels